Installing Apache Atlas and it’s awkward

Atlas is a scalable and extensible set of core foundational governance services – enabling enterprises to effectively and efficiently meet their compliance requirements within Hadoop and allows integration with the whole enterprise data ecosystem.

Apache Atlas provides open metadata management and governance capabilities for organizations to build a catalog of their data assets, classify and govern these assets and provide collaboration capabilities around these data assets for data scientists, analysts and the data governance team.

– Apache Atlas

Few days ago, I need to install Apache Atlas for my work. Followed the official document for the build and installation but it did not work with really awkward errors.

Build instruction: https://atlas.apache.org/#/BuildInstallation

Btw, Maven is needed, if you don’t know, to install it, you need Java. In short:

sudo apt-get update
sudo apt-get install default-jre
sudo apt-get install openjdk-8-jdk

cd /usr/local
sudo wget https://www-eu.apache.org/dist/maven/maven-3/3.6.3/binaries/apache-maven-3.6.3-bin.tar.gz
sudo tar xzf apache-maven-3.6.3-bin.tar.gz
sudo ln -s apache-maven-3.6.3 apache-maven

export JAVA_HOME=/usr/lib/jvm/java-8-openjdk-amd64
export M2_HOME=/usr/local/apache-maven
export MAVEN_HOME=/usr/local/apache-maven
export PATH=${M2_HOME}/bin:${PATH}

When I execute this command:

mvn clean -DskipTests install

It outputs this error:

[ERROR] Failed to execute goal org.apache.maven.plugins:maven-checkstyle-plugin:2.9.1:check (checkstyle-check) on project apache-atlas: Execution checkstyle-check of goal org.apache.maven.plugins:maven-checkstyle-plugin:2.9.1:check failed: Plugin org.apache.maven.plugins:maven-checkstyle-plugin:2.9.1 or one of its dependencies could not be resolved: Failure to find org.apache.atlas:atlas-buildtools:jar:1.0 in https://repo.maven.apache.org/maven2 was cached in the local repository, resolution will not be reattempted until the update interval of central has elapsed or updates are forced -> [Help 1]

Look at the error: Failure to find org.apache.atlas:atlas-buildtools:jar:1.0, go to the link provided: https://repo.maven.apache.org/maven2/org/apache/atlas/atlas-buildtools/ and see what we have:

org/apache/atlas/atlas-buildtools

../
0.8-incubating/                                   2017-03-17 06:38         -      
0.8.1/                                            2017-08-29 16:22         -      
maven-metadata.xml                                2017-08-29 17:05       379      
maven-metadata.xml.md5                            2017-08-29 17:05        32      
maven-metadata.xml.sha1                           2017-08-29 17:05        40      

There is no 1.0 version?! WTH?!

Let’s see what we have on Google for atlas-buildtools:

Google search results

I went through each and every result in 171,000 pages and none of them has the 1.0 version. Just kidding, just looked at first 2. WTH Apache?!

So I think that 0.8.1 version would work, but why does it use 1.0 version? It’s maven, so it must be stated in the pom.xml file. Let’s open it up and see.

We have 2 places with this:

<dependency>
   <groupId>org.apache.atlas</groupId>
   <artifactId>atlas-buildtools</artifactId>
   <version>${project.version}</version>
</dependency>

I changed both of them to:

<dependency>
   <groupId>org.apache.atlas</groupId>
   <artifactId>atlas-buildtools</artifactId>
   <version>0.8.1</version>
</dependency>

Run the command again and it works. Next, just follow the instruction https://atlas.apache.org/#/Installation:

mvn clean -DskipTests package -Pdist,embedded-hbase-solr

cd distro/target
tar -xzvf apache-atlas-{project.version}-server.tar.gz
cd apache-atlas-{project.version}

export MANAGE_LOCAL_HBASE=true
export MANAGE_LOCAL_SOLR=true
python3 bin/atlas_start.py

Now, Atlas is ready, default username/password is admin/admin!

Visual Studio Code Remote Development is just… AWESOME

In the past, for remote editing files from server via ssh, I had to use rmate ( https://github.com/aurora/rmate/ ):

TextMate 2 adds a nice feature, where it is possible to edit files on a remote server using a helper script. The original helper script provided with TM2 is implemented in ruby. Here is my attempt to replace this ruby script with a shell script, because in some cases a ruby installation might just be too much overhead for just editing remote files.

This script can be used with some other editors (e.g. Sublime Text) via available plug-ins.

The shell script needs to be copied to the server, you want to remote edit files, on. After that, you should set-up your editor to communicate with rmate.

But, it’s not enough, not friendly, lack of many abilities to help us work… fast and comfortable. And the game got changed today with Visual Studio Code Remote Development!

You just need to install the plugin, provide the ssh command to the server and all the rest are covered by the plugin, like WOW.

Otherwise, you can also work with a sandboxed toolchain or container-based application inside (or mounted into) a container.

In case the server (or your virtual machine) is not installed or configured to allow ssh, install it first:

sudo apt-get update
sudo apt-get install openssh-server -y
sudo ufw allow 22

Chrome extension with Yeoman errors while installing on Windows

What’s Yeoman?

Yeoman helps you to kickstart new projects, prescribing best practices and tools to help you stay productive. To do so, we provide a generator ecosystem. A generator is basically a plugin that can be run with the `yo` command to scaffold complete projects or useful parts.

yeoman homepage

Today, when I kickstarted a new project in Windows 10, there are some errors when I use yeoman:

npm install -g generator-chrome-extension

There comes some errors like:

which failed Error: not found: python2

To get rid of this, please check:

  1. cmd is run with Administrator permission
  2. windows-build-tools is installed using:
 npm install --global windows-build-tools 

Try again to see if it works.

Javascript Promise the easy way

Javascript Promise is not a new concept in Javascript world but it is not so popular before it is officially supported in ES6. Javascript Promise is not difficult itself, however many people find it a little bit hard to approach it at the beginning. Today, I decided to explain the concept in the easiest way as I can.

1.  First look at Promise?

As mentioned in Mozilla docs:

A Promise is a proxy for a value not necessarily known when the promise is created. It allows you to associate handlers with an asynchronous action’s eventual success value or failure reason. This lets asynchronous methods return values like synchronous methods: instead of immediately returning the final value, the asynchronous method returns a promise to supply the value at some point in the future.

As always, official document’s description is quite hard to understand at first glance for beginners. Hope that after reading my article, you come back to this definition and understand what it intended to say. But after skimming (in case you did not, go back and skim the above definition), you can realize that the word “asynchronous” is repeated 3 times. It suggests us that Promise is something related to asynchronous execution manipulation.

Maybe you are so familiar with the concepts but, to clarify synchronously/asynchronously in programming:

When a program gets executed, it is combined of a series of tasks to be executed.

  • When you execute a task synchronously, it means that the task will have to wait for it to be finished before moving on to the next task.
  • When you execute a task asynchronously, it means that the program can move on to another task before it gets finished and the execution of the asynchronous task will not affect the execution of the program.

In my opinion, asynchronous programming is a quite complicated topic because it needs to perform careful and sophisticated techniques to control how things tie together when they occur at the same time.

Because of that, to be less stressful and more natural when working with asynchronous, Promise was born and get supported natively in Javascript recently. It is a tool for us to deal with controlling asynchronous tasks in Javascript.

But before diving into detail of how Promise works, let’s consider the following story:

Imagine you’re in a restaurant to have lunch and you ordered a lunch set with fried chicken, rice, and salad.

Have you ever think about how they make the food and serve your order? In my way of thinking, there are 3 parties cooperate with each other to prepare your disc of food, and I assume that they stand in separated areas.

One is the one who prepares chicken, one is the one who makes the salad, and the other one cooks the rice.

The flow should be abstracted like this:

  1. Job I: The one who fries chicken:
    • Step 1. Take the raw chicken from the refrigerator to thaw
    • Step 2. Marinate chicken with spices for an hour
    • Step 3. Fry chicken in the pan until chicken’s juices run clear when skin is pierced with a knife
  2. Job II: The one who makes salad:
    • Step 1. Prepare vegetables
    • Step 2. Mix the vegetables with mayonnaise
  3. Job III: And the one who cooks rice:
    • Step 1. Wash rice
    • Step 2. Cook the rice

For each job, to perform each step, you must wait for the previous step to be completed but the processing of each job will not block the whole kitchen’s execution flow. The result of the current step may be the input for the next step. In this case, the frying chicken will not block the whole kitchen’s execution.

And to marinating chicken, you have to thaw it first. And you have to have your chicken marinated with spices before frying with oil.

While chicken is being made, salad and also rice is being processed as well.

Promise manages tasks almost the same way with the kitchen’s execution is the program’s execution, jobs (frying chicken, making salad and cook rice) is like asynchronous tasks in the program.

Let’s get started!

2.  What is Promise in Javascript?

When a program gets executed, an asynchronous task takes time to complete its execution (or fail) and then return some result.

We know that it will come at a specific time in the future but the program cannot ensure when exactly the event occurs.

A Promise acts like a proxy between the program and the asynchronous task. It promises to the program that it will inform to the program when the execution of the asynchronous task is completed or fail but not affect the execution or result of the asynchronous tasks. Instead of immediately returning the final value, the asynchronous method returns a promise to supply the value at some point in the future.

The program must pre-define the scenarios of what to do when the asynchronous task is completed and when it fails.

3.  How do Promises work?

A Promise in its life it will be in one of these states:

  • pending: initial state, neither fulfilled nor rejected. This state is when it got created using new Promise constructor.
  • fulfilled: meaning that the operation completed successfully.
  • rejected: meaning that the operation failed.

Creating Promises syntax:

var promise = new Promise( /* executor */ function (resolve, reject) {
    // Do something, possibly an async task.  

    if (/* Everything turned out fine */) {
        resolve(/* Maybe the result of the async tasks etc */);
        // After this the state of this Promise becomes fulfilled.  
        // When resolve function is called, it means that this Promise notified   
        // the completion of the asynchronous task being moderated.  
    }
    else {
        reject(Error("Some error message"));
        // After this, the state of this Promise becomes rejected.  
        // When resolve function is called, it means that this Promise notified   
        // the end of the asynchronous task with an error.  
    }
});

The created Promise object wraps the asynchronous execution to moderate the what happened inside the executor.

Once it (the Promise) gets declared, the executor gets called immediately. The executor is called before the Promise constructor even returns the created object.

The executor normally initiates some asynchronous tasks, and once that completes, if everything turned out fine it calls the resolve function to resolve the promise or else rejects it if an error occurred.

.then() method

The object promise of type Promise has the method then(). This method takes 2 functions as its parameters.

One is a function that will be passed the resolved value of the Promise once it is fulfilled.

The other is a function to be called if the Promise is rejected.

Consider the following example. Note that in this program, we suppose that 1 second means 1 minute. And we use the setTimeout() function (kind of asynchronous) for easy illustration:

var thawChicken = tineToThaw_minutes = {
    console.log("Chicken is being thawed...");

    return new Promise((resolve, reject) = {
        let isSomethingWrong = false;

        setTimeout(() = {
            if (!isSomethingWrong) {
                resolve("Thawed chicken"); // <= This will be the argument of the first function parameter of then method.  
            } else {
                reject(Error("Something wrong happended!")); // <= This error object will be passed as the argument to the second function parameter of then method.  
            }

        }, tineToThaw_minutes * 1000);
    });
}

thawChicken(3 /* minutes */).then(
    chicken = console.log("What we have after waiting? - " + chicken),
    error = console.log("Error message: " + error.message)
);  

Live example: https://jsbin.com/hesimasoni/edit?js,console

If you change isSomethingWrong to true in the above example, you will see the error notified.

.catch() method

As you can see in the above example, the Promise has both a success and an error handler.

But what happens if success handler throws an error? There’s nothing there to catch it then an error gets swallowed.

So, .catch() method is here to help you out this case. Just use it like this:

thawChicken(3 /* minutes */).then(
    chicken = console.log("What we have after waiting? - " + chicken),
    error = console.log("Error message: " + error.message)
).catch(errorHander);

I recommend ending all promise chains with a .catch()!

4.  Promise Rules

  • When a Promise is initiated, its state is pending. This Promise can only be changed into a resolvedor rejected
  • A resolved or rejected promise is settled, and must not transition into any other state even if you re-set it.
new Promise((resolve, reject) = {
    resolve('resolved!');
    resolve('re-set resolved!');
    reject('rejected!');
}).then(
    mes = console.log(mes),
    err = console.log(err)
);

This will output: “resolved!”

  • Once a promise is settled, it must have a value (which may be undefined). That value must not change.

5.  Chaining

Because the .then() method always returns a Promise, so we can chain thens together to transform values or run additional async actions one after another in a queue and control the flow of asynchronous tasks all together in an easy and natural way in lexical.

Transform values

new Promise((resolve, reject) = {
    resolve('message');
}).then(
    mes = mes + ' to transform'
).then(
    transformedMessage = console.log(transformedMessage)
);

The output will be: “message to transform”.

In this example, when I got the mes from above Promise, I transform the new message to the next then as then transformedMessage by returning it in the previous then.

Control asynchronous tasks flow

By returning an async task, we can also chain thens to run async actions in a sequence flow. This is an advantage of Promise over the classical callback to avoid what called callback hell.

var thawChicken = tineToThaw_minutes = {
    console.log("Chicken is being thawed...");

    return new Promise((resolve, reject) = {
        let isSomethingWrong = false;

        setTimeout(() = {
            if (!isSomethingWrong) {
                resolve("Thawed chicken"); // <= This will be the argument of the first function parameter of then method.      
            } else {
                reject(Error("Something wrong happended!")); // <= This error object will be passed as the argument to the second function parameter of then method.      
            }

        }, tineToThaw_minutes * 1000);
    });
}

var marinateChicken = (chicken, spices) = {
    console.log("Marinating chicken with spices...");

    return new Promise((resolve, reject) = {
        setTimeout(() = {
            resolve("Marinated Chicken");
        }, 5000);
    });
}

thawChicken(3 /* minutes */).then(
    chicken = {
        console.log("What we have after waiting? - " + chicken);
        let spices = ["Salt", "Sugar", "Pepper", "Garlic"];
        return marinateChicken(chicken, spices);
    },
    error = console.log("Error message: " + error.message)
).then(
    marinatedChicken = console.log("After marinating we have: " + marinatedChicken)
);

Live example: https://jsbin.com/xuquyikojo/edit?js,console

By using chaining, the code looks so natural in lexical.

5.  Promise.all

As the Mozilla docs:

The Promise.all(iterable)method returns a single Promise that resolves when all of the promises in the iterable argument have resolved or when the iterable argument contains no promises. It rejects with the reason of the first promise that rejects.

Because Promise.all returns a Promise, so it is then-able. The returned promise is fulfilled when all promises passed to the all method have resolved. This helps us to define an action to be performed when all promises get done.

Promise.all gets rejected when any of passed-in promises get rejected despite whether or not the other promises have resolved.

Patterns commonly be used in Javascript

Nowadays, Javascript is one of the most trending languages in software development. Javascript itself can be used in so many fields: from Frontend to Backend as well as from Web development to Mobile application development and even Desktop app or embedded devices. Right from its creation and several upgrades, Javascript is extremely flexible and open language. Because of that, there comes pros and cons while using Javascript. Today, I will introduce to you several patterns that are commonly be used to overcome those “cons”.

But why do we need to learn those things? Many developers claim that they just write it and it works well and returns the correct result, that’s all done. I am so sorry to say no (L), your product is getting changed so frequently. It’s not the game called “Write One, Run Forever”. Your colleagues or even you will have to dive into your code, changing something to adapt to the new requirements. Think about that case when you find your code like a mess of meaningless things and it takes hours to understand. That’s the reason why.

Before diving into patterns and snippets, I would like to explain to you some basic/advanced concepts you may have already known.

1.    Basic/advanced concepts

  • Closure

A closure in Javascript is the ability of a function to manipulate its lexical scope (where it is defined) even when it got called in somewhere else outside its lexical scope.

There are two things to remember is that, one is that the closure of a function is created when it is defined, not when it is executed. The other is, the closure remembers the variables in its scope by reference, not by value. So when the value got changed, it will be reflected inside the function.

  • IIFE (Immediately Invoked Function Expression)

As mentioned in Mozilla docs:

IIFE (Immediately Invoked Function Expression) is a JavaScript function that runs as soon as it is defined.

It is a design pattern which is also known as Self-Executing Anonymous Function and contains two major parts. The first is the anonymous function with lexical scope enclosed within the Grouping Operator (). This prevents accessing variables within the IIFE idiom as well as polluting the global scope.

The second part is creating the immediately executing function expression (), through which the JavaScript engine will directly interpret the function.

Using IIFE, we can create a separated execution context to not overwhelming the global context. I will talk about this later.

  • Callback

In Javascript, except primitive types, everything else is an object including function. A callback (as known as callback function), is a function that is passed to another function as a normal object argument.

  • Hoisting

Let’s look at this code snippet:

var a = 1;
log(a + ” “+ b + ” ” + c);
var b = 2;
var c = 3;

In many languages, this will causes errors since b and c are not declared when it got used, but not Javascript as I mentioned before about its flexibility. This will output “1 undefined undefined”. And in this case, it is called hoisting. Let me explain what above code got translated using hoisting:

var a = 1;
var b;
var c;
log(a + ” “+ b + ” ” + c);
b = 2;
c = 3;

Hoisting means, all declarations (including variable and function) will be hoisted to the top of the code before any manipulation, but all the assignments are left where they are (as the above translated code with b and c).

  • Currying

Currying is the process of transforming a function to another function with pre-defined parameters. Let’s look at this code snippet:

var multiply = function(a, b) {
    return a * b;
}
var square = function(a) {
    return multiply(a, a);
}

Someone may say: “I can use bind with the first argument to be null to achieve currying?”. Yes, technically, you can. But bind is not intended to use this way. This will lead to wtf code in your program. Your colleague or maybe yourself after 1 month will ask: “What is this shit?”.

  • Memoization

Firstly, I want to that it’s memoization, not memorization (I used to be confused when I first approached it).

Memoization is the process of caching the result of expensive operations and use it later. Think of this classic Fibonacci problem:

The Fibonacci sequence is a series of numbers where a number is found by adding up the two numbers before it. Starting with 0 and 1, the sequence goes 0, 1, 1, 2, 3, 5, 8, 13, 21, 34, and so forth. Written as a rule, the expression is xn = xn-1 + xn-2.

memoization

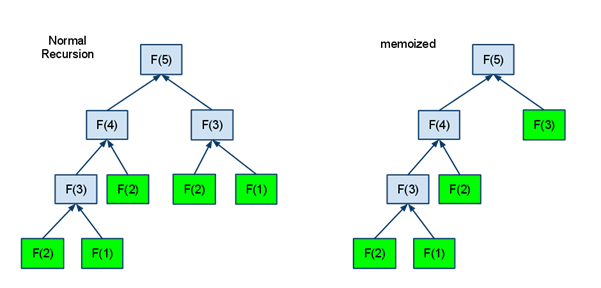
In this example, xn = xn-1 + xn-2, it means xn-1 = xn-2 + xn-3, you can see the repeat of xn-2 and it can be so expensive operation on its chain, and caching it using memoization reduces the execution time quite a lot. You can find out more about how memoization is implemented, refer my Github repository here.

That’s quite enough for those boring (but important) basic concepts, now let’s dive into something more interesting.

2.    Module Pattern

I am a fan of this pattern, I use it almost every time I work with Javascript. By using this pattern, your Javascript code will be organized and encapsulated. This is how it looks like:

var ModuleName = (function() {  
  // Your code.
})();  

By using IIFE, we create a new execution context for our code to keep the privacy and reveals what we intended to public to global context. In detail, what is used inside the anonymous function will be private to global context and what is returned from the IIFE call is public to global context. That’s how your Javascript code got organized (into a specific module) and encapsulated (using the privacy).

Let’s move to detail of its implementation.

2.1.           Private methods and properties

This pattern make use of the privacy of execution context to hide the private methods. Look at the below example:

// Authentication module is pre-defined under name: authenticationModule.
varCarEngineOperatorModule = (function(authenticationModule) {
    // ============================================================
    // Other parts of the code.
    // ============================================================
    var _ran_Distance_km = 1824250;

    var _isAuthenticated = function(userKey) {
        returnisAuthenticated(userKey);
    };

    var_fillFuel = function() {
        // Filling fuel operations.
    };

    varstartCarSystem = function(userKey) {
        if !_isAuthenticated(userKey) return;

        _fillFuel();
        // Other operations.
    };
    vargetRanDistance_km = function() {
        if !_isAuthenticated(userKey) return;

        return_ran_Distance_km;
    }
    // ==============================================================
    // Other parts of the code.
    // ==============================================================

    return {
        startCarSystem: startCarSystem,
        getRanDistance_km: getRanDistance_km
        // Other public methods.
    };
})(authenticationModule);

In this example, I illustrate the processes of a self-driving car, under voice commands of the car owner.

To start the car, the user says to the car: “Okay car!” (Like “Okay Google!”). The voice command receiving module will hear the command, filter it and communicate with the car engine operator module (CarEngineOperatorModule) to start the car. In this case, the start method of the operator module (startCarSystem()) will be public to the global context, left behind operations private.

If some module attempts to call the private methods, for example _fillFuel(), there will be an error. This error is an intended action because we don’t want any module to manipulate a dangerous method out of our control (like __fillFuel()).

The similar concept is applied to private properties. We will hide some properties that only be used inside the module or can only be got under some circumstances. In this case, the number of how many kilometers the car was ran is a personal information, and we don’t like anyone to read it easily, so this information will be hidden to the outside world. After the successful authentication, you can get some information about the owner.

3.    Object chain

I often use this pattern to store settings or constants in a separate area to get things organized. Once you make any change to a setting or constant or whatever you define, you will find it easy to locate the place you need to change, and change only once. You will not have to care about other positions may using your settings. This pattern uses object literal syntax by multiple layers. This is how it looks like:

varthemes = {
    water: "Water",
    forest: "Forest",
    ocean: "Blue Ocean"
};
varsupporters = {
    male: "Male",
    female: "Female"
}
varconstants = {
    setting: {
        debugMode: false,
        theme: themes.ocean,
        supporter: supporters.female
    },
    message: {
        error: {
            failRequest: "Request failed! Try again later.",
            authenticationFail: "You're not authenticated, not able to access this area!"
        },
        warning: {
            delete: "You're deleting {1}. This process cannot be undone!",
            grantPermission: "You're granting {1} permission to the user named {2}"
        }
    }
}

This pattern takes advantage of the suggestion feature of IDEs. When you type “constants.”, a list of constants will be shown for you to quickly choose the one that you need.

4.     Facade pattern

If you’re working with Javascript, you will surely use libraries out there. Most of the times, we just use part of the library.

To focus on what you work with and simplify the usage of the library. Think of it as how API to other developers is implemented. It provides the simplicity to who uses it and hide the underlying complexity. Only facades are public to the outside world.

Let’s take a look at this pattern in action.

This is what I use in a real project (Take a look at this repository)

varauthFacade = (function() {
    var _totp = newTOTP({
        issuer: 'ACME',
        label: 'AzureDiamond',
        algorithm: 'SHA1',
        digits: 6,
        period: 30
    });
    return {
        get2FAToken: function(callback) {
            getSecretCode(function(secretCode) {
                if (!secretCode) return;
                secret = OTPAuth.Secret.fromB32(secretCode);
                callback(_totp.generate());
            });
        }
    }
})();

This authFacade module simplifies the OTPAuth library, by providing the get2FAToken facade, who use it just pass the callback function to work with it.

get2FAToke(callback);

The rest of the work is hidden.

Those are the most common patterns in my opinion. Hope that it helps you in your future Javascript development work.

Manage versions of Python with pyenv and zsh in MacOS

You are working on different projects that require different versions of Python? You’re tired of switching between them?

Luckily, Pyenv is here to help you out.

pyenv lets you easily switch between multiple versions of Python. It’s simple, unobtrusive, and follows the UNIX tradition of single-purpose tools that do one thing well.

Today, I will guide you through the steps of making it work with default terminal or with zsh.

Before we start, brew is used to install pyenv. If you’re already installed brew, skip this step. Otherwise, install brew through this link: https://brew.sh

Homebrew installs packages to their own directory and then symlinks their files into /usr/local.

Step 1: Install pyenv

$ brew install pyenv

Step 2: Add config to load pyenv every time we open a new shell

If you’re using default mac Terminal:

$ echo 'if which pyenv > /dev/null; then eval "$(pyenv init -)"; fi' >> ~/.bash_profile

Else if you are using zsh instead:

$ echo 'if which pyenv > /dev/null; then eval "$(pyenv init -)"; fi' >> ~/.zprofile

Now restart your terminal.

Step 3: Confirm if it is properly set up

$ which python

It will output something like this:

$ which python
/Users/duchoang/.pyenv/shims/python

Step 4: Install python versions

To list all python versions that can be installed using pyenv:

$ pyenv install -l

This will output a really long list like:

Available versions:
  2.1.3
  2.2.3
  .
  .
  .
  stackless-3.3-dev
  stackless-3.3.5
  stackless-3.4.1
  stackless-3.4.2

Choose the version you want, example 3.6.2. To install:

$ pyenv install 3.6.2

Wait for downloading and installing to complete.

If an error occurs, with the message like:

zipimport.ZipImportError: can't decompress data; zlib not available

Try this in your terminal:

$ CFLAGS="-I$(brew --prefix openssl)/include -I$(xcrun --show-sdk-path)/usr/include" \ LDFLAGS="-L$(brew --prefix openssl)/lib" \

And then:

> pyenv install 3.6.2

Step 5: Switch between different python versions

To list all installed versions:

$ pyenv versions

This will output:

* system (set by /Users/duchoang/.pyenv/version)
  3.6.2

To switch to 3.6.2 as global python version:

$ pyenv global 3.6.2

You can also change the version of python to a local folder:

$ cd ~/your/local-project/
$ pyenv local 3.2.6

This will create a `.python-version` file and the version of python inside the project will be set despite the global version.

Better way to copy demo code from docs.python.org

I read a lot of code in Python docs. So there comes so much demo code to run on my own way with modifications. So I have to copy those demo, but its format is like:

>>> transposed = []
>>> for i in range(4):
... # the following 3 lines implement the nested listcomp
... transposed_row = []
... for row in matrix:
... transposed_row.append(row[i])
... transposed.append(transposed_row)

Needs to be turned to:

transposed = []
for i in range(4):
    # the following 3 lines implement the nested listcomp
    transposed_row = []
    for row in matrix:
        transposed_row.append(row[i])
    transposed.append(transposed_row)

This leads to a fix of removing “>>>” and “…” and also indentations and it takes time.

So I decided to create a Chrome extension to help me out. This is quite simple, that when I copy the demo code, it removes those redundancies and be ready to be run.

I use this regex to catch it:

/^>>> |^... |^...$/gm

The rest is so simple, just several minutes for a simple extension.

document.addEventListener('copy', function(e) {
    var selectedText = window.getSelection().toString();

    if (~selectedText.indexOf('>>>')) {
        var fixedCode = selectedText.replace(/^>>> |^... |^...$/gm, '');
        e.clipboardData.setData('text/plain', fixedCode);
        e.preventDefault();
    }
});

Source code: https://github.com/ducfilan/Copy-Python-docs-code-extension

git pull error: “error: insufficient permission for adding an object to repository database .git/objects”

Today, when I was pulling changes from a remote repository, the error busted out:

error: insufficient permission for adding an object to repository database .git/objects

The error message indicates the problem itself, current user does not have insufficient permission to add objects to .git/objects folder.

If you’re familiar with Linux ownership and permission, it’s so easy for you. In case of not, read the following topic, it’s really interesting though: Linux Ownership and Permissions

So, we need to grant permission to the folder. We have 2 approaches:

1. Change owner of the folder and its sub-folders to current user

$chown [current-user-name]:[group-name] .git/objects -R

In my case:

$chown ducfilan:root .git/objects -R

Note: current username can be gotten from:

$echo $USER

2. Chmod the folder and its sub-folders to grant write permission to the current user

If you execute the below command, you will see your permission to the objects folder:

$ll .git | grep objects
$ll .git/objects

If you faced with the mentioned problem, you will see that you don’t have permission to that folder. Depends on your decision, you can grant which permissions to the folder you want. Maybe:

$chmod 766 .git/objects -R

Now you are ready to pull it down.

P/s: Personally, I recommend the first approach, it’s a natural and secure way.

Docker completion for Zsh with Prezto

I am currently using Prezto as the configuration framework for Zsh. Having completion while working with Docker on Terminal can boost our productivity a little bit to focus on what’s more important. So let’s get it configured.

~/.z/m/c/e/src  curl -fLo ~/.zprezto/modules/completion/external/src/_docker https://raw.githubusercontent.com/docker/cli/master/contrib/completion/zsh/_docker
~/.z/m/c/e/src  curl -fLo ~/.zprezto/modules/completion/external/src/_docker-compose https://raw.githubusercontent.com/docker/compose/master/contrib/completion/zsh/_docker-compose
~/.z/m/c/e/src  exec $SHELL -l

Now check if it works.

2017-08-28_101501

How to setup an SFTP server with RSA public key authentication mechanism

Why SFTP over FTP? The reason is visualized in its name: “S”, that means Security. Using SSH will employ a client-server model to authenticate two parties and encrypt the data between them. This topic will guide you through how to setup an SFTP authentication mechanism using public key cryptography, the working OS is CentOS version 6.9. Let’s get started!

1. Make sure ssh and ssh-server are installed

user@localhost:$which ssh
/usr/bin/ssh

2. Create a new user and a new group in server

To be easier and clarified in permission managing, we should create a separated group for SFTP and add the corresponding user to the group. To acquire this, using the following groupadd and useradd command under root:

user@localhost:$sudo groupadd sftp_users 
user@localhost:$sudo useradd sftp_user1 
user@localhost:$sudo passwd sftp_user1
user@localhost:$sudo usermod -G sftp_users sftp_user1

3. Generate RSA public and private key

Let’s make a recall how public key cryptography works. This link for detail. In short, SSH key pairs can be used to authenticate a client to a server. The client creates a key pair and then uploads the public key to any remote server it wishes to access. This is placed in a file called authorized_keys within the ~/.ssh directory in the user account’s home directory on the remote server.

If you’re under *nix based OS, you can use ssh-keygen to generate keys as being described below. Otherwise, for Windows, you can use PuTTY, you can refer this article to know how to process the generating.

user@localhost:$ssh-keygen -t rsa -f sftp_rsa

Then, copy the public key to the server within the ~/.ssh folder (corresponding to which user will be authenticated).

user@localhost:$cd /home/sftp_user1/ 
user@localhost:$mkdir .ssh # In case of no .ssh folder inside
user@localhost:$ls -a
...
.ssh
...
user@localhost:$cd .ssh # <= Copy the public key to this folder

4. Correct permissions and owner

user@localhost:$cd /home/sftp_user1/
user@localhost:$chmod 700 .ssh 
user@localhost:$chown sftp_user1:sftp_user1 .ssh 
user@localhost:$cd .ssh mv sftp_rsa.pub authorized_keys
user@localhost:$chmod 600 authorized_keys
user@localhost:$chown sftp_user1:sftp_user1 authorized_keys

5. Change SSH configurations

user@localhost:$vi /etc/ssh/sshd_config

Check the following configurations (uncomment these settings by removing # if needed):

RSAAuthentication yes
PubkeyAuthentication yes
AuthorizedKeysFile .ssh/authorized_keys
PasswordAuthentication no

6. Restart the service

 user@localhost:$service sshd restart

Now you can check if it works by using any program that supports SFTP.